Wednesday, January 12, 2011

The Pressure to Be Perfect

Now that I'm done Eric's album, I really need to start Nathalie's. She's 18 months now and I don't have anything done for her. I'm even further behind in Kayla's, but I want to work on Nathalie's next.

I need to start with the cover page. The first thing anyone will see when they open her album. And I want it to be perfect. I want to look at it and almost cry because I love it so much.

OK, maybe not cry, but I want it to be perfect. So, I've avoided doing it at all. I've just come off Eric's album where I haven't done a lot of embellishments (can't really do flowers and flourishes in a boy's album) and so I'm in a bit of a creative standstill. I'm so far behind, that a lot of my pages are just embellished with paper and so I wanted to pump up the volume a bit.

So, last night, I sat down in my craft room, determined to start. I grabbed the 8x10" picture of her just an hour or two old. And I sat there. Nothing I thought of or planned seemed good enough for this little perfect baby.

I almost put it away with the thought that I'd be inspired tomorrow, but I persevered and just made a simple page. In the end I like it. I don't think I love it, but it's still a reflection of who I am and where I am today and that's OK. I let go my need for a perfect, elaborate layout and just let it flow.

And in the end, I survived. And the layout is done and now I can move forward.

Tuesday, January 11, 2011

Last Salty Glimmer

I've had so much fun with this technique!! This card I created using a homemade Walnut Stain Distress Ink spritz. It came out very dark which made stamping on it a bit of a challenge. But I love how dramatic it looks. I did stamp a couple of background images in Walnut Stain over top of the background, but they didn't really show up, although they do create some texture in real life. Then I stamped the same bird (Tim Holtz: Urban Tapestry) and saying (Tim Holtz: Urban Chic) in black ink overtop and then just mounted it on brown cardstock. Very simple. I kind of think it's still missing something, but then I like it how it is, so I'm just going to leave it.

Monday, January 10, 2011

More Salty Glimmers

I loved playing with the Salty Glimmers technique I posted about yesterday (have I mentioned how much I LOVE my Technique Junkies newsletter??). I did the small blue panel, but I wanted to try a whole background. I did the technique with the Walnut Stain glimmer mist I made using Distress Reinkers. It came out very dark and dramatic. Quite cool actually.

The instructions tell you to let it air dry. Anyone who knows me, knows I don't have a whole lot of patience to wait for things to dry. Besides, when I want to make a card, I never think to make the background ahead of time! I used to have a ton of backgrounds which I'd make and then put aside, but I never used them. I want to make the card from start to finish and I always wanted a colour or technique I didn't have in my stash, so now I just make whatever I'm going to want.

Anyway, back to being impatient. I made a purple background using a Dusty Concord spritz I made and threw the salt on it. I figured that if I just used my heat gun, the salt would go flying everywhere, so I grabbed some paper towel, wadded it up, and lightly dabbed the bulk of the wet stuff off. Some of the salt stuck to the paper towel and some stayed on the paper. I did this until most of the pools were absorbed and then flipped the paper over and flicked it from behind so that the salt would come off. Then I heat set it for a few seconds. Then flip and flick and heat set again. When it was dry, I just picked off the last few pieces of salt. Voila, a cool background and no waiting. My kind of technique. And as an added bonus, when I soaked up some of the ink, it lightened the background so it wasn't quite as dark.

After I had my background, I ran it through the scallop border by Tim Holtz. Then I cut a darker purple piece with the same border (I cut the purple piece slightly wider so that I could line everything up later). I then lined it up so that there was a small shadow at the bottom and cut off the extra on the other three sides. I stamped some background Tim Holtz images from Urban Chic and then stamped the bird (Tim Holtz: Urban Tapestry) and saying (Tim Holtz: Urban Chic) in black. Adhered it all to a white card and stamped the saying (Tim Holtz: Just Thoughts) in Dusty Concord Distress Ink.

Sunday, January 9, 2011

Butterfly Glimmer

I actually did some stamping yesterday. I have been so caught up in scrapbooking, that I haven't done very much stamping lately. I love playing with new techniques, but I get in a groove with scrapbooking and then I can't seem to switch. I will have an idea, but I'm almost scared to try it because I'm worried that it won't turn out and I'll be upset and depressed (not seriously depressed, but in a way that doesn't make me want to stamp; maybe more of a frustrated thing). I seem to have a mental block lately about how to finish off a card. OK, I have the main part done; now what do I do because it needs something, but I don't know what. And I'm generally a minimalist, so I struggle with just leaving it knowing I want to do something else.

Anyway, I find the first few cards I make are all right, but then I can generally get back into my groove.

I received my Technique Junkies Newsletter awhile ago and since I've been so busy, I just put it on my craft room desk so that I can look through it later when I have time to play. I love my TJ newsletters as they are always full of cool ideas and often use product I already have (huge bonus!).

The technique that caught my eye yesterday was "Salty Glimmers" and it was kind of a play on what we used to do years ago, but it's beautiful and so I was so excited to try it again. I love that some of the techniques we did years ago keep coming back in various variations.

With this technique, you need to spritz your white matte cardstock with water and then spritz with a glimmer mist. I wanted a blue and a brown (I'll show that one tomorrow), but didn't have the right colour in Tattered Angels or Smooch Sprays, so I created my own with Distress Inks, Perfect Pearls and a mini mister (I've mentioned how to do that before, but if you don't know how, just ask and I can explain it!). When the paper is wet and shiny, throw some sea salt chunks on it. I remember doing this with watercolour paper and water colours. In my memory, the salt chunks pulled the colour so that area was lighter, but in this case, they pulled the colour and made it pool around it and so you got dark areas. It was quite cool!

These do take awhile to dry as they suggested you air dry them (more about how to get around that tomorrow). So, I walked away and came back after the kids were in bed so that I could try to make something out of it.

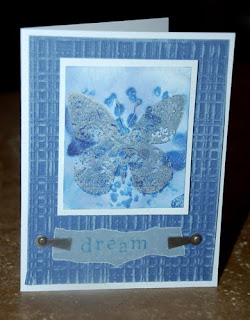
I also wanted to play with my new Plaid embossing folder from Sizzix. I embossed a piece of Core'dinations paper and then sanded it to use as my background. I love it!!

When my glimmer piece was dry, I stamped my butterfly (Fontwerks) with Silver Staz-On, but it didn't show up well, so I overstamped it in Chipped Sapphire Distress Ink. The Staz-On will resist the Distress Ink, so it came out like a shadow which I thought was very cool.

Overall, I like this card well enough. It won't make it into my favorite pile, but for the first card back in awhile, it's fine.

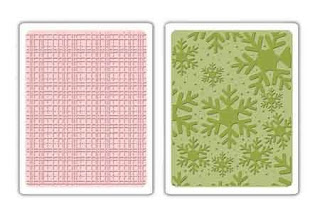
The Plaid folder comes bundled with a Snowflake one. I already had a Snowflake folder from Provocraft, but I really wanted the Plaid one. I do quite like the Sizzix Snowflake one though as it has some bigger snowflakes, so I'm happy I got the set.
I did keep playing with this technique and will have more to share tomorrow.

Saturday, January 8, 2011

It's the last of Eric for awhile


I am (hopefully) posting my last Eric layout for awhile. I am hoping to have lots of stamping, as well as Kayla, Nathalie & Family layouts coming up in the next few months.

I was stamping a bit today. OK, not really stamping, but sort of. I haven't made cards in forever, but it was my niece's birthday party today and Kayla & Eric each wanted to make Mackenzie a card, so I hung out in my craft room with each of them. While they were busy stamping, colouring, glittering and applying stickers, I played. I can't remember the last time I played. I got my new Technique Junkie's newsletter a week or two ago and it's been sitting on my desk waiting for me. So, I leafed through it and found a technique to try. I got some of it done, but alas, didn't have time to actually stamp and put the card together. I might head in there now to do that so I can post it tomorrow.

So, on to Eric. I pulled this idea from a layout in a magazine. I used another one of my kits (Hot Chocolate by Fancy Pants) so that the papers would match and then basically cut them to fit the empty spots. I wasn't sure as I was doing it as there is a lot of colour on this page. I tend to do a lot of monochromatic, but I figured since the papers were supposed to go together, I'd just go with it. I think the striped paper pulled it together.


So, hopefully tomorrow, I'll have something new to show! I did make a wedding card in December, but I can't seem to find the picture/scan of it. Hopefully I'll find the digital version one day so I can share it!

Friday, January 7, 2011

I did it!!

Today marked the end of my work on Eric's album for awhile! I can't explain how happy that makes me. It's been fun getting him caught up, but it gets a bit boring working on the same thing for too long. I did intersperse his layouts with a few family album ones, but now I will focus on the girls' books. I am very far behind in those!! And I'll keep plugging away at the family album. The nice thing about the family book is that there aren't a ton of layouts to do each year, so once I'm caught up with it, it will be fairly easy to maintain.

I'm back to simple layouts. I've kind of lost my mojo, so it's been a bit of work to get it back. I've been flipping through magazines and looking for ideas. I'm fine with that since I always make it my own anyway. Sometimes, it's a colour combination that jumps out; or an embellishment or a page map. At any rate, the finished layout never looks like what is in the magazine which is a good thing. I've put my own spin on it!

This layout is one I did for a special verbal exchange I have with Eric all the time:

Me: Eric. Can I tell you a secret?
Eric: Yes.
Me: I love you.
Eric: Oh Mom. That's not a secret.

We went to Build-A-Bear in September for his birthday and built a Darth Vadar bear (he's obsessed with Star Wars at the moment). We recorded us saying that little exchange above. He was so excited and I know that down the road it will be fun to listen to it.

The layout itself is pretty simple.


It's basically just a piece of patterned paper with the upper corners rounded, then some ribbon. I chose a nice fat ribbon to take up more room. I journaled along the bottom and then highlited the exchange on the red strips.

I'm starting to get my creative juices flowing again and am excited to create, so hopefully I can keep up with this for awhile!

Thursday, January 6, 2011

Happy New Year

It's been awhile since I posted. Life just got crazy and when that happens, something has to give. And as usual, it's the fun stuff! I did almost no stamping or scrapbooking and definitely no blogging over the holidays, but I'm really hoping to get back into it!

I was in such a good groove for awhile in December, but it's that whole time thing.

I am seriously only 2 or 3 layouts away from being caught up in Eric's album and I am committing to finish those in the next week or two. I feel like I've been saying, "I'm almost caught up" for months, but as of this time last year, I was only at his 1st birthday, so I did 4 years worth of memories in one year. That's not too bad, I guess. I also did a Portrait album and started a few layouts for my family album. I held demo nights and open houses, tried out new product and techniques, taught classes until June, so I guess when I look at it that way, I did quite a bit.

Here is a layout I did recently. I wrote down all the funny things Eric said for awhile and then I dug them out and put them on a layout. Some of you might remember a layout which looked very similar to this one with the 9 coordinating squares on each side of the layout. Instead of sewing each square, though, I distressed it with the Distress-It-All. It's the same sketch, but a different look. So, recycle your ideas; they won't all look the same!!


So, Happy New Year and let's get creative!