Tuesday, November 13, 2012

Hallowe'en 2010

I'm behind in my scrapbooking (aren't we all??). I'm working through to Nathalie's 2nd birthday and came across her Hallowe'en photo, so I scrapbooked it on a really simple layout. Then, I went through and got Kayla & Eric's photos for 2010 and did the same layout so it's done. I used to do one layout and then figured I'd copy it when I got to that kid's photo, but now I do it all at once since I have the paper and can easily recreate it. Then when I get to that time period it will be like a gift as it's already done!


So, make it easy on yourself and don't feel bad about just copying the same layout across multiple kids! The goal is to get the memories captured!

Friday, November 9, 2012

Journals

We are taking the kids to Disneyland and I decided it would be fun for each of us (OK, by each of us, I mean, Kayla, Eric and me since Nathalie can't write and Glenn isn't going to journal) to have a journal. I was going to buy super fancy ones, but then I figured I could just make my own instead.

So, I bought 3 composition books from the dollar store for $1.25 each and then went to the scrapbook store and bought some Disney paper and I cut a few things out of the Cricut and voila, cool Disney Journals.

Before:


Mine:


Kayla's:


Eric's:


Wednesday, November 7, 2012

Be Yourself

I saw a layout in a magazine and loved how clean it looked, but how there was still a small collage element on the left side, so I thought I'd see if I could pull it off. I'm not generally very good with collage at all as I like things to be linear and all lined up and neat so this was a bit of a challenge. In the end, I love how it turned out.

As an aside, I can't wait for my new scanner so I can post better pictures that are actually straight!


Wednesday, October 31, 2012

Happy Hallowe'en

Remember when stencils were all the rage and we all bought a ton?? Well, now they seem to just sit there as I don't really use mine anymore. Then I discovered this cool technique!! It's using Distress Inks and those stencils and gives an awesome background.

First, create a background using Distress Inks and an Ink Blending Tool. Then put a stencil over top and spritz with water. Heat set a bit (be careful not to melt your stencil), then remove your stencil and either heat set or set aside to dry (I'm impatient, so I heat set). As it dries, the areas where there was water will lighten. It gives you an awesome tone on tone dimensional background.

I did this technique for my Hallowe'en card. I used a harlequin stencil and I really like how it turned out! And it worked out so well because the little postmark stamp fit perfectly in my bottle cap!!

Monday, October 29, 2012

Product Focus: Ranger Heat It Tool

When I first started stamping, I bought a Marvy heat gun and it worked great. It eventually died and I replaced it with another Marvy and it was great too. My mother then wanted one so she could use it to thaw out the horse trailer locks if they froze on their trip down to Florida (they haul the horse to Florida every December and then back in April). She wanted to use it with her Eliminator. Well, the new one wouldn't work, so I gave her my old one which seemed to work with her Eliminator and I had the new Marvy one.

I hated it. The cord on this one was so thick and it wasn't easy to move around, so I thought I'd try the Ranger Heat It tool. It was a good thing I ordered one because not long after it arrived, my Marvy died. I was pretty mad because it had only been less than 6 months (my other ones lasted forever, so not sure what happened with this one). Well, part of me was mad because it was so new and the other was happy because I hated that heat gun.

I love my Ranger Heat It tool though. It has a much wider heating area and so I find I don't burn stuff if it takes awhile to heat. And it's very  nice to hold. Best of all, however, is how quiet it is!! I was doing a demo this weekend while I was at a Retreat and you could barely hear it.

Even though I rarely heat emboss, I use my heat gun all the time to heat set ink and to dry backgrounds and I am so happy with my new Heat It tool.


Friday, October 26, 2012

Excited!!

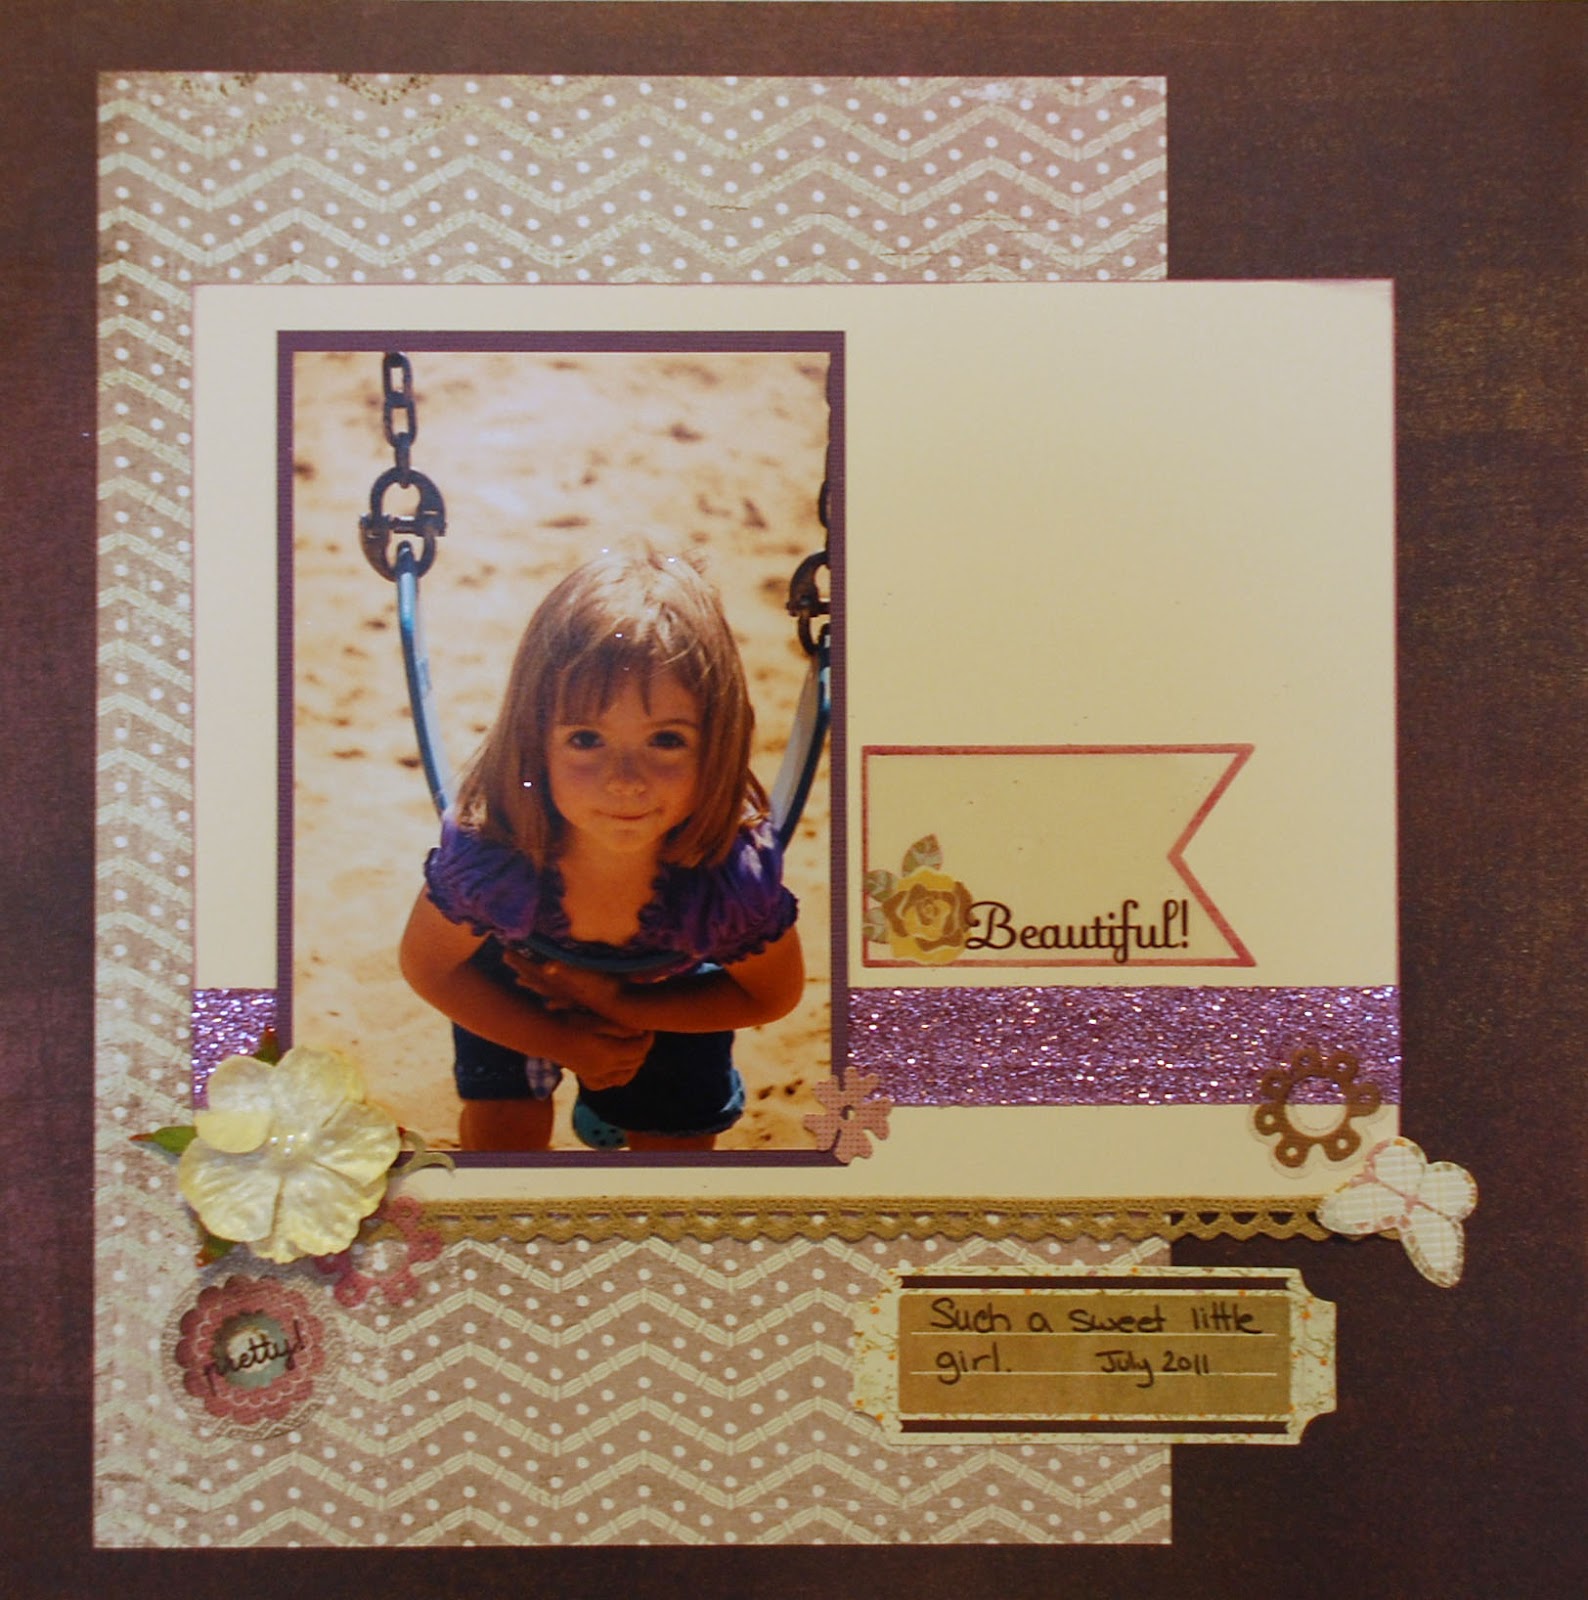
I scan all of my scrapbook pages. Well, I don't personally scan them, but I take them to the local scrapbook store and pay them to scan them. I am somewhat paranoid about something happening to my albums. I know I could recover all the photos since they're backed up, although any of the old photos would be lost (pre-digital age). But what about all that work? And all the journaling and memories? So, I figure if I get the pages scanned, then at least I can get them reprinted if I ever need to do that. They wouldn't be as nice, but at least the memories would be preserved. So, I scan the pages. But I usually wait until I have a bunch (and am finished a section in a scrapbook) to take them in. In the meantime, however, I still want to share them, so I take photos of them. The problem with the photos, however, is that I can never get them exactly square and straight, so when I blog them, they don't look all that great.

Yesterday I bought a large format scanner! I am so excited. I had wanted one several years ago, but felt I couldn't justify it and then when I decided to get one, I found out the one I had been looking at was discontinued. Since there are so few large format scanners, it was now going to be double the price. I couldn't justify that much money, so that idea went bye. Recently, though, I discovered another one in the same price range as the original one I was eyeing and yesterday, I ordered it. I'm so excited! I'm going to be able to scan my pages and blog them much nicer now. And I won't have to wait to take them in to the store to do it.

I'll also be able to offer a scanning service for those who want it. I haven't finalized prices, but I'll announce that later. I highly recommend getting your pages scanned since it would be very sad to lose all those photos, work and memories if something did happen. It also makes it easier to share albums. You can scan yours and just get it printed for family if they want a copy. It won't be as nice as the original, but you get to keep the original, so since you did the work, that's totally fair!

Thursday, October 25, 2012

Metallic Distress Stains

I finally had some time last week to play with my new Tim Holtz Metallic Distress Stains and I love them. I shouldn't be surprised, since I am always impressed with any product Tim comes out with, but these are really cool. They have a gorgeous metallic sheen, but they're still water based, so mix well with his other Distress Products. I thought they might be cool as a resist, but since they're water based, that didn't work, but it opened up new mixing possibilities.

For this technique, I put down some Metallic Distress Stain and then some regular Distress Stain on my non stick craft sheet and misted with water. Then I placed a piece of white cardstock and smooshed it around in the stains. I pulled and twisted until I got the look I wanted and then put it aside to dry. It looks so gorgeous!! The metallic is nicely marbled throughout the background.


For this card, I used Aged Mahogany Distress Stain and then overstamped it with the same colour Distress Ink so it matches perfectly. The background stamp is an awesome brick background from Unity Stamps and then the butterflies are from Tim Holtz. I added a few Candi and called it done.

Wednesday, October 24, 2012

Sleep Tight


As I was playing with my paper pack for my club last month, I came up with this simple layout. It was just sort of cutting and placing things down until I liked how it looked.


I had some washi tape that went with the pack and it was fun to just add it in places to add some dimension. The flowers were actually printed on the paper and I just cut them out.


Tuesday, October 23, 2012

Hallowe'en Goosebumps

I had fallen behind on my monthly techniques and so sat down in September and came up with 4. A couple of them used Goosebumps which I hadn't played with for awhile. I really like that stuff even though it's messy and goes against my sticky messy rule (ie: I don't do things that are sticky or messy). Anyway, I spritzed some on my non stick craft sheet and then used it as an ink to stamp on cardstock. When it dried, I added some Distress Ink overtop and buffed it off the Goosebumped area. I love it. I love resist techniques, so I'm always excited to play with a new one.


This card was made with a cool Hallowe'en set I just got in. I am not a big Hallowe'en person, but I thought with kids, it would be cool to have a few stamps.

Saturday, October 6, 2012

What's New

I spent a good chunk of yesterday unpacking my new order and then the doorbell rang and it was another order. Talk about fun!! So, today, I wanted to share some of the new stuff that arrived yesterday!!

Some new M-Bossabilities from Spellbinders (these ones are bigger than the regular ones)

Holiday Magic


Tweets & Twigs


Winter Wonderland


I also got some new tinsel from Tim Holtz

Silver


Black


Autumn


Winter


And I got a very cool new embossing folder set from Hero Arts & Sizzix

Christmas Words & Dots


And what would a stamping addiction be without a couple new stamps?

Stay the Course (I loved these words)


Country Road (What a great masculine set)


I literally just got it all opened and reconciled so I haven't priced anything yet, but if you are interested in anything, just email me and I'll get it priced for you. I also have limited quantities of these so if you are interested, let me know and I will pull it for you.

Thursday, September 27, 2012

I love my boots

Nathalie had these ladybug rubber boots that she wore when she was around 2. She loved those things and would wear them all the time. Even with shorts or a dress. She wore them so much that they cracked. Everyone knew about them and they really looked quite cute on her. So, I knew I had to do a layout about them. It's ironic that I ended up with a photo of her crying while wearing them, however, I can guarantee that the tears were about some major injustice suffered by her at the time and not about the boots.


Tuesday, September 25, 2012

Sweet Girl

I saw a layout very similar to this in a magazine and fell in love. I knew I wanted to make it. Then I saw it again in another magazine as a reference to something and figured it was a sign to make it right then. So I did.

It's really so simple and was quite quick: 9 hearts out of coordinating paper. That's what takes the longest (picking the coordinating paper: thankfully I was using a paper pack and that part was super quick and easy). Then I cut out 9 hearts using my Cricut (Doodlecharms cartridge) and just matted my photos. The hardest part was figuring out a title, and I found the Sweet Girl one as part of a bigger title in my Graphically Speaking Cartridge, so I cut it out and it was done.

I love it.


Monday, September 24, 2012

Big Girl Bed

This latest layout came together rather quickly, other than the journaling. I wanted to write something about how she went from not being able to climb out to almost getting her leg over the side of the crib in less than 15 minutes. I had the layout done except for the journaling and I tried cutting shapes out and placing them on and nothing worked. I had already stuck everything down, so I didn't want to risk wrecking it by running it through my printer and the background cardstock had little raised circles, so I wasn't convinced it would print well anyway. In the end, I just drew some lines and wrote out what I wanted to say and I quite like how it turned out! A few years ago, I would have never done that, so I'm happy with how I've changed and let stuff go. It doesn't have to be perfect!


Friday, September 21, 2012

Blankie Still ...

I've been scrapbooking quite a bit lately and I'm quite happy about that. I can see the light at the end of the tunnel for this year in Nathalie's scrapbook. Of course, there is still a list longer than a child's wish list at Christmas of layouts still to complete for other books, but oh well. I'll slowly get there, right??

I've been doing a bunch of quick and simple layouts which are great because they're quick so I get more done and I am really admiring simple. That's sort of my style and so it obviously appeals to me.

I am sure I did a layout with Nathalie's blankie already, but I had a few more pictures, so I did another quick layout to show that she still really loves it.


Wednesday, September 19, 2012

8 months

I was scrapbooking a couple of weeks ago and went to scrapbook these photos of Nathalie in a cute little patchwork dress. When I was looking through them, though, I noticed that she looked different and I realized that they were taken at two totally different times. I went through my photos and determined that they were taken 8 months apart. It was rather impressive that the dress still fit her, but I was blown away by how much she had changed and grown up in those 8 months. She went from still looking like a baby to looking like a toddler. I decided that would be the focus of the layout: the change in the 8 months and I love how it all came together.


I put the dates in bottle caps and I like how they turned out too. These are from the Bottle Cap Company and they're really light weight and already nicely flattened. I tried flattening the metal ones you get from the beer store, but they were never even and I generally made a large mess, so I love these ones!! And they're a perfect 1" so as soon as I get a 1" circle punch, it will be even easier to make centers for them.

Friday, September 14, 2012

More Goosebumps

While I was playing with my Goosebumps, I tried another idea I had. Since I was already making a mess, why not go all the way, right??

I spritzed some Goosebumps onto my non stick craft sheet and it created a puddle. I used that as a "stamp pad" and stamped images onto cardstock (clean your stamp right away afterwards though and don't forget to clean the nozzle too). I let them dry and then added Distress Ink overtop with my ink blending tool and just wiped it away from the Goosebumps. I love how this resist turned out. The colour absorbed into the Goosebumped areas, but you can still see the resist and feel the texture. It's so cool!!


Thursday, September 13, 2012

Goosebumps Spray

I brought in Goosebumps several months ago and did some cool resist stuff using stencils. Then it sat on my shelf. I love the stuff and think it's cool, but it's a bit on the messy side for me and you have to clean the nozzle after you use it or it will harden in there and then it's wrecked, which is a bit high maintenance for me.

But ... I needed to do a bunch of techniques for my technique club, so I thought I'd bring it out and play with it and I really do like the stuff. For this technique, I just sprayed it onto cardstock, let it dry and then coloured over it with Distress Inks and an Ink Blending Tool. Then I wiped off the ink from the Goosebumped areas and it was so cool! I really like the effect and the Goosebumps has some texture to it so it looks quite impressive. I'll definitely be bringing it out again to play soon!


Wednesday, September 12, 2012

Nanny ... Sit Down

When my nephew was younger, he couldn't say Nathalie, so he called her Nanny and it kind of stuck. This one day, he was telling her to come sit down and surprisingly she did. I bet he was about three and she was a year and a half. I got a great video of it, but it's tough to scrapbook that! I did get this great photo last summer and thought that it represented that day though: Max telling Nanny something.


I keep reading to not do all of your journaling on the computer as people will want to see your writing. Well, I have pretty poor writing, so I still do most of my journaling via type, but I've been trying to write more. Sometimes it's quicker to do that too than to try to measure and line up how I am going to type it out. I created these tags and then stamped lines on them so it would be quick and easy to write and I do like how it turned out.

Monday, September 10, 2012

3, 2, 1 ... Destruction

Well, I'm back and I'm in the groove. It was an insanely busy summer with three little kids running around. I vowed that I was going to do tons of cool things with them and not just sit in front of the computer or work all day. So I did. But unfortunately, I still had to work, which meant I didn't stamp or scrapbook. I was also sick for a good chunk of the summer and that didn't help. I had one layout that I started in July when my cousin came over to scrapbook with me for a day and I didn't get back to it until Saturday. But I got back into the groove in a big way and will hopefully be around for a bit.

I get in these ruts where I don't feel creative and it feels overwhelming to go in and create. When I finally get over it, then it feels awesome and I'm totally into it and want to create. Getting from overwhelmed to excited can be a long struggle sometimes.

Anyway, here is the layout I started in July. I went into the bathroom one time when Nat was younger and she had unrolled almost a whole roll of toilet paper. Since it was already on the ground, I figured I might as well take a photo.


Wednesday, August 22, 2012

Kellycraft Get It Straight Laser Square

I've been gone. I was sick before we went camping and then last week I was trying to catch up. And as a result, stamping got put aside. In the meantime I've been checking out some of the new cool stuff that's coming out.

One of the new tools is the Kellycraft Get It Straight Laser Square. At first I thought it was sort of whatever, but after watching a video (or two), I'm totally sold!! I'm definitely ordering one in my next order.

I know it looks like it would be primarily used for scrapbooking, however, I think it would be quite useful for cards too; for things like adding brads or Candi all in a row. Or to line up a stamp so it's straight too.


Friday, August 10, 2012

Another Vintaj

Just a quick post because I'm running out of time to get these done before I need to tackle my other work (the stuff I actually get paid for). But I wanted to share this card I made for my Vintage demo. I quite like how it turned out.


Thursday, August 9, 2012

BJ

We had to put my old cat, BJ, down last fall. It was really hard as she was 18. They say that cats have 9 lives and seriously, that cat used her 9 and a few extras. She was a tiny inbred barn cat that I took with me when I moved out up north to my first teaching job. She was company for me when I was lonely and missing home. I want to do a layout devoted just to her, but she was always so tolerant of the kids and so I have BJ layouts in each of their albums. Here is the one I did for Nathalie awhile ago.


As it turns out, I don't love it since it's a bit loud and busy for me, but it's done, right???

Wednesday, August 8, 2012

It's Hard to be You

For some reason, I love the photos I have of my kids crying. Not because they're hurt or sad because I wouldn't really take a photo and rejoice in that, but because if I did take a photo, it was more likely a tantrum and I giggle a bit at showing them the photo when they are older or being a challenging teenager.

As a result, I love to do crying photos. I taught Junior High for many years before switching gears and so I have a bit of a sarcastic streak and I don't give a whole lot of sympathy for tantrums and ridiculous fits.

I love these photos. As I wrote in the journalling, I can't even remember why Nathalie was crying; likely she didn't get something she wanted. I must have been laughing at her to take the photo and I was quite happy to capture the moment on a layout. I can't have everyone think she's always happy, right??


Tuesday, August 7, 2012

Nat & Me

I'm behind. I was really sick a couple of weeks ago with strep throat and then I got better but after about a week on the antibiotics, I started to get sick from them. So I have not been in my craft room in quite awhile which means I don't have very much to share. Oh well, that's the way life works, right??

I did do this layout a couple of weeks ago. I kind of like how it turned out; simple, but that's me.


Friday, August 3, 2012

Full of Mischief

Nathalie has this funny side where she is just mischievous and up to no good, but yet looks so adorable. These photos are ones that I took after taking the kids to Sears for their annual Christmas photos. She was running around the driveway and I had to capture it. I think they turned out better than the Sears ones and were fun to scrapbook.


Thursday, August 2, 2012

Love Each Other

I was working on layouts for my paper pack club a couple of weeks ago and came across one in a magazine that I loved and wanted to try to recreate. It was simple, but so cool.


After my disaster with sewing fabric, my sewing machine has been pretty much rededicated to sewing on paper and everyone is happier with that arrangement. I love the look of sewing on my pages, but I don't do it that often. In the end, I pulled out the machine for this one and like how it finished the look.

I was also really happy with my title. It would have been so easy to do something like Siblings, but instead, I was able to give them a message that I think is important.

Wednesday, August 1, 2012

Beautiful

I was so sick last week (which is why I wasn't here blogging). I can't remember the last time I was that sick. I was in bed for 3 days pretty much straight and then barely functioned the 4th day. And the irony was that I had been doing so well with scrapbooking and had lots to share. Normally, when I disappear, it's because I don't have anything to share.

I created this layout before I felt like I was going to die last week. I actually quite like how it turned out with all the different purples.


There really isn't a whole lot to say about it. Just a photo that I really liked and wanted to scrapbook.

Tuesday, July 31, 2012

Everyday Moments

I really like how simple this layout is, and how repeatable it can be. Change the paper and you have a totally different look. You can change the number of photos or the layout and you wouldn't know it was the same base idea. I made this one for my July paper pack club and like how it all came together.


I chose strips of paper and just created a background and then added photos and some embellishments. Because I used a paper pack, it was easy to find papers that would work well together. I had some embellishments from the same line and just added those and voila, it could easily be a layout you could create in 15 minutes!

Monday, July 30, 2012

Accept Yourself

I really hate journaling. And for the most part I feel like I suck at it, but I bought a book a year or two ago that changed my perspective and helped me get past it a bit. Sometimes, it's about looking at it from a different perspective. And I look at scrapbooking as a hobby, but more importantly as a gift to my kids. When they're older, they're going to be able to relive the memories and read my advice and hopes for them.

I really love how this layout turned out. The photos are of Nathalie wearing a dress that I sewed for Kayla when she was about a year. It's made from this yellow Winnie the Pooh fabric. I went through this very brief phase where I thought I'd sew clothes for Kayla. Unfortunately, I really sucked at it. Despite having a university education, I couldn't understand the instructions and frankly, sewing is an exact kind of hobby and I'm definitely not an exact kind of crafter, so I gave all my material to my mother in law who is quite good at that stuff.


In the past, I would have written about how cute she was in the dress I made for Kayla, but instead, I just made that one line and instead focused on my disastrous attempt at sewing. I emphasized that it was OK to not be good at things and that you just needed to learn to accept that and move on.

So, while I love how the layout came together and all of that, I mostly love how I journaled my experience to Nathalie.

Sunday, July 29, 2012

Nathalie turns 3

Nathalie turned three on July 3 and we hosted a family BBQ on Canada Day to celebrate. And what kind of celebration would it be without a cake?? My awesome cousin came over again to help me create an Ariel cake. I've decided Ariel is going to be Nathalie's princess. She had mentioned Ariel a few times and so it became it.

I couldn't find an exact cake I loved, so we picked elements from several and in the end it turned out so awesome. I just love it. We both agreed it was our favorite!!


I bought the figures because I'm not crazy and there is no way I'm making them. The bonus was that she can play with them afterwards too. The sand was graham cracker crumbs and we wrote Nat with sea shells. Of course, Nathalie didn't seem overly excited about it, but that's partly her personality. It was fun and it came together rather quickly!!

Monday, July 23, 2012

Score, Fold, Create

I love the Annie's Attic books. I'm always quite impressed with them. Nice thick pages full of colourful pictures and great instructions. I have quite the collection!

They have a new book coming out: Score, Fold, Create. It has 28 projects that will help you learn to use your Scor Pal. It looks pretty cool. And at $15, it's pretty reasonable too.


Sunday, July 22, 2012

Magnetic Die Storage

It's been the question for a long time - how do you store your thin dies? I have mine on magnetic sheets in a CD case and for the longest time, it's worked great. Now with bigger dies, they don't fit as well.

Art Bin has these cool storage cases with magnetic sheets. The bins come with 3 sheets and you can fit up to 21 sheets in each bin. Then when you are going anywhere, you just grab the case. Very cool!! And you won't lose them because they are enclosed.

The bin will be $16 and a 3 pack of extra sheets will be $8.